 Storeino
Getting started
Prerequisites
- Node.js 18+ — Nuxt 3 requirement.
- A code editor — VS Code with the Vue (Volar) extension is recommended.
- A terminal — the one inside VS Code is fine.
You do not need a Storeino account or any deployed environment to start. Souk-theme runs entirely on your laptop.
Clone and install
The souk-theme repo is private. You'll need read access — ask Abdel to add you on GitHub. Once you have access:
git clone git@github.com:storeino/souk-theme.git
cd souk-theme
npm install
npm install runs a postinstall step that patches one broken ESM dep and prepares Nuxt. The first run takes a couple of minutes.
Run the dev server
npm run devNuxt boots at http://localhost:3001. Open it in a browser — you should see the souk demo storefront (header, banner sections, footer).
The storefront may look mostly empty at first — that's normal. It's trying to load a theme document from the API but has no auth token yet. See Connecting to a store below if you need real data; for most section work you don't.
Connecting to a store
When you build a section, you have to decide whether it needs to talk to a real Storeino store. Three modes, in increasing order of setup cost. Pick the lightest one that works for what you're building.
Mode 1 — No connection (recommended starting point)
For content sections — Banner, Heading, PromoStrip, Hero, anything that renders the merchant's static config without fetching live data — you don't need a real store at all. Just edit the Vue + manifest, run npm run dev, and drop a temporary preview into a page:
<!-- temporarily in pages/index.vue -->
<MyPromoStrip :config="{ message: 'Test', linkText: 'Shop now', linkHref: '/' }" />
Hit http://localhost:3001/ — your section renders. The theme's API calls fail silently (no auth, no theme document loaded), but for static content that doesn't matter — your section receives its data from :config, not from the API.
This is what 80% of section work looks like. Stick to it for as long as you can.
Mode 2 — Local + a long-lived test JWT (for data-driven sections)
If you're building a ProductGrid, CollectionsGrid, or anything else that calls $storeino.products.search(...), you need a real store on the other end. The souk-theme connects to api-stores using a pre-minted JWT read from environment variables — there is no clientId / clientSecret handshake.
Note for anyone coming from the legacy docs: the old
config/development.jsonwith{ env, token: { clientId, clientSecret } }does not apply to souk-theme. Different theme model, different auth flow. Ignore it.
Steps:
- Get the JWT. Ask Abdel for a long-lived test token bound to a dev store. (You can also copy
x-auth-tokenfrom your browser's DevTools after logging intoadmin.storeino.world— but those expire quickly, so a real test token is better.) - Create
souk-theme/.env(it's already in.gitignore):bashNUXT_PUBLIC_API_BASE=https://api-stores.storeino.world/api NUXT_PUBLIC_AUTH_TOKEN=eyJhbGciOiJIUzI1NiIsInR5cCI6IkpXVCJ9... - Restart
npm run dev. (Env vars are read once at boot, not per request.)
The theme now authenticates every API call with your token. $storeino.products.search(...) returns real products, the home page renders the active theme document, etc.
A starter template lives at souk-theme/.env.example — copy it:
cp .env.example .env
# then edit .env with your real values
Mode 3 — Test inside the deployed dev builder (for final QA)
Once a section works locally, the final test is: does it behave correctly inside the real visual builder as a merchant would experience it?
- Push your branch to GitHub.
- Ask Abdel to deploy souk-theme to the dev CDN (
themes.storeino.world). - Open
https://admin.storeino.world/stores/themes→ click Customize on a souk theme. - Your section appears in the library, can be dragged onto a page, edits flow through, save persists.
You'll do this once per feature, not every iteration. Daily work happens in Modes 1 or 2.
Working with your dev store
A few concepts you'll want clear from day one.
What "your dev store" actually is
A Storeino store is a row in MongoDB representing one merchant — their subdomain, their products, their orders, their themes. Abdel will give you access to a dev store (e.g. fixpro.storeino.world) with a few sample products and an existing theme. You won't sign up for a Storeino account; you'll get handed credentials.
Your NUXT_PUBLIC_AUTH_TOKEN is bound to that store. Every API call your local souk-theme makes returns data from that one store. Switching stores means switching tokens.
What "your theme" actually is
A theme document is a row in MongoDB (themes collection) belonging to one store. A store can have multiple themes — usually one active, others as drafts. Editing in the builder edits one specific theme document.
When you open the builder at https://admin.storeino.world/stores/themes and click Customize on a souk theme, the builder URL points at that theme document's _id. Your local code changes to souk-theme/ apply to every souk theme on every store, but the merchant-saved config is per theme document.
Active vs inactive themes
A store can have many themes but only one active one. The active theme is what shoppers see when they visit <subdomain>.storeino.world. Inactive themes are drafts.
Two things to know:
- Theme activation is required for storefront preview. If you edit a theme that isn't the active one, the storefront at
fixpro.storeino.worldwill show whatever the active theme renders — not your edits. To see your edits on the real storefront, activate that theme:- Open
https://admin.storeino.world/stores/themes - Find your theme in the list
- Click activate
- Open
- The builder works on inactive themes too. The builder iframe loads the storefront with
?theme=<your-theme-id>in the URL, which forces it to preview your theme regardless of which one is active. So you don't strictly need to activate to see edits in the builder — only to see them at the public URL.
Making your theme visible in the dev store's theme picker
By default a freshly-created theme might not show up in the Customize picker on admin.storeino.world/stores/themes because its team.name controls discoverability. If you can't find your theme there, ask Abdel to set its team.name = "DEVELOPMENT" (a one-off API call). After that it appears in the picker and you can click Customize on it.
What's safe to do
You won't break anything by editing on a dev store. Worst case is a broken theme document that someone has to delete or re-seed. Don't:
- Run scripts under
souk-theme/scripts/unless told to (they upload to the CDN / deploy). - Change
team.nameon a prod theme (only dev stores). - Hit the prod API base (
api-stores.storeino.com) from local dev — keepNUXT_PUBLIC_API_BASEon.world(dev).
Creating a theme to work on
There are two different "create a theme" operations in the Storeino ecosystem. Don't confuse them.
Type 1 — A new merchant theme document (what you'll do)
When you want a fresh, empty souk theme on your dev store — to test from a blank canvas, to try the AI generator, or just to keep a "real" theme separate from your experiments — you create one through the admin UI exactly like a merchant would. The dev store starts with at least one theme already; this is for adding more.
- Open
https://admin.storeino.world/stores/development/themes(note the/development/segment). - Pick the souk template from the catalog list.
- Fill in the basics: title, public name, description, image. These are display-only — they don't affect what your section code does.
- Click Create. A new theme document appears in the store's themes list at
https://admin.storeino.world/stores/themes. - To preview / edit it in the builder: find it in the list, click Customize. The builder opens with that theme's
_idin the URL. - To make it the storefront default at
<subdomain>.storeino.world, click activate on its card. (Optional — the builder works on inactive themes too via?theme=<id>in the iframe URL.)
This is the flow you'll use to add scratch themes. It's identical to what a real merchant does.
The new theme is created from the catalog defaults — empty
templates.home, default token palette. From the builder you then drop sections in, edit them, save.
Type 2 — Seeding the catalog (what Abdel does)
When the souk-theme codebase itself changes (new sections, bumped version, new default tokens), the catalog entry in api-stores has to be updated so new stores see the right defaults. That's what npm run seed-registry does, inside the souk-theme repo:
# In souk-theme/, run by Storeino staff:
API_BASE=https://api-stores.storeino.world/api API_TOKEN=<staff-token> npm run seed-registry
This writes (or updates) the single name: "souk" entry in the themes collection — the template from which Type 1 documents are cloned.
You will not run this. It needs a staff-level API token and affects every merchant who creates a new theme afterwards. Mentioned here only so you know what seed-registry in package.json is for if you read it.
Which one to choose
| You want to… | Use |
|---|---|
| Make a new theme on your dev store to experiment | Type 1 (admin UI) |
| Reset the catalog defaults after changing souk-theme | Type 2 (Abdel's job) |
| Edit an existing theme | Neither — just open it via Customize in the admin UI |
How auth works in production (one paragraph, for context)
You don't need to manage this — it's documented so you understand the picture. In production, every storefront (fixpro.storeino.world, mysou9.storeino.world, ...) is fronted by a service called theme-manager (an Express proxy on port 7070). When a shopper hits the storefront, theme-manager looks up the store, mints a fresh JWT via the public /themes/subdomainTheme endpoint, attaches it as x-auth-token on the forwarded request, and the souk-theme Nuxt server reads it from the request headers. You skip all of this in local dev by hard-coding a token in .env. That's the whole reason NUXT_PUBLIC_AUTH_TOKEN exists.
About
npm run manifestBoth
npm run devandnpm run buildfirst runnpm run manifest. This walks everycomponents/sections/*/manifest.jsonand producespublic/sections/manifest-index.json— the catalogue the builder reads to show its section library. You usually don't run it directly. If you edit a manifest and the builder doesn't pick up the change, that's the script to re-run (or just restartnpm run dev).
Browse an existing section
In the file tree, open:
components/sections/Heading/
  ├── index.vue       (78 lines)
  └── manifest.json   (48 lines)
The Heading section is the smallest real section in the codebase. Read both files end to end — that's roughly the surface area of every section. Bigger sections (Banner, ProductGrid) follow the same shape with more fields.
Open it inside the visual builder
To see the builder UI you have two options.
Option A — use the dev environment (recommended for stagiaires)
The builder is already deployed:
https://admin.storeino.world/stores/themesLog in with the credentials Abdel gave you. Click Customize on a souk theme. The builder opens in a new tab.
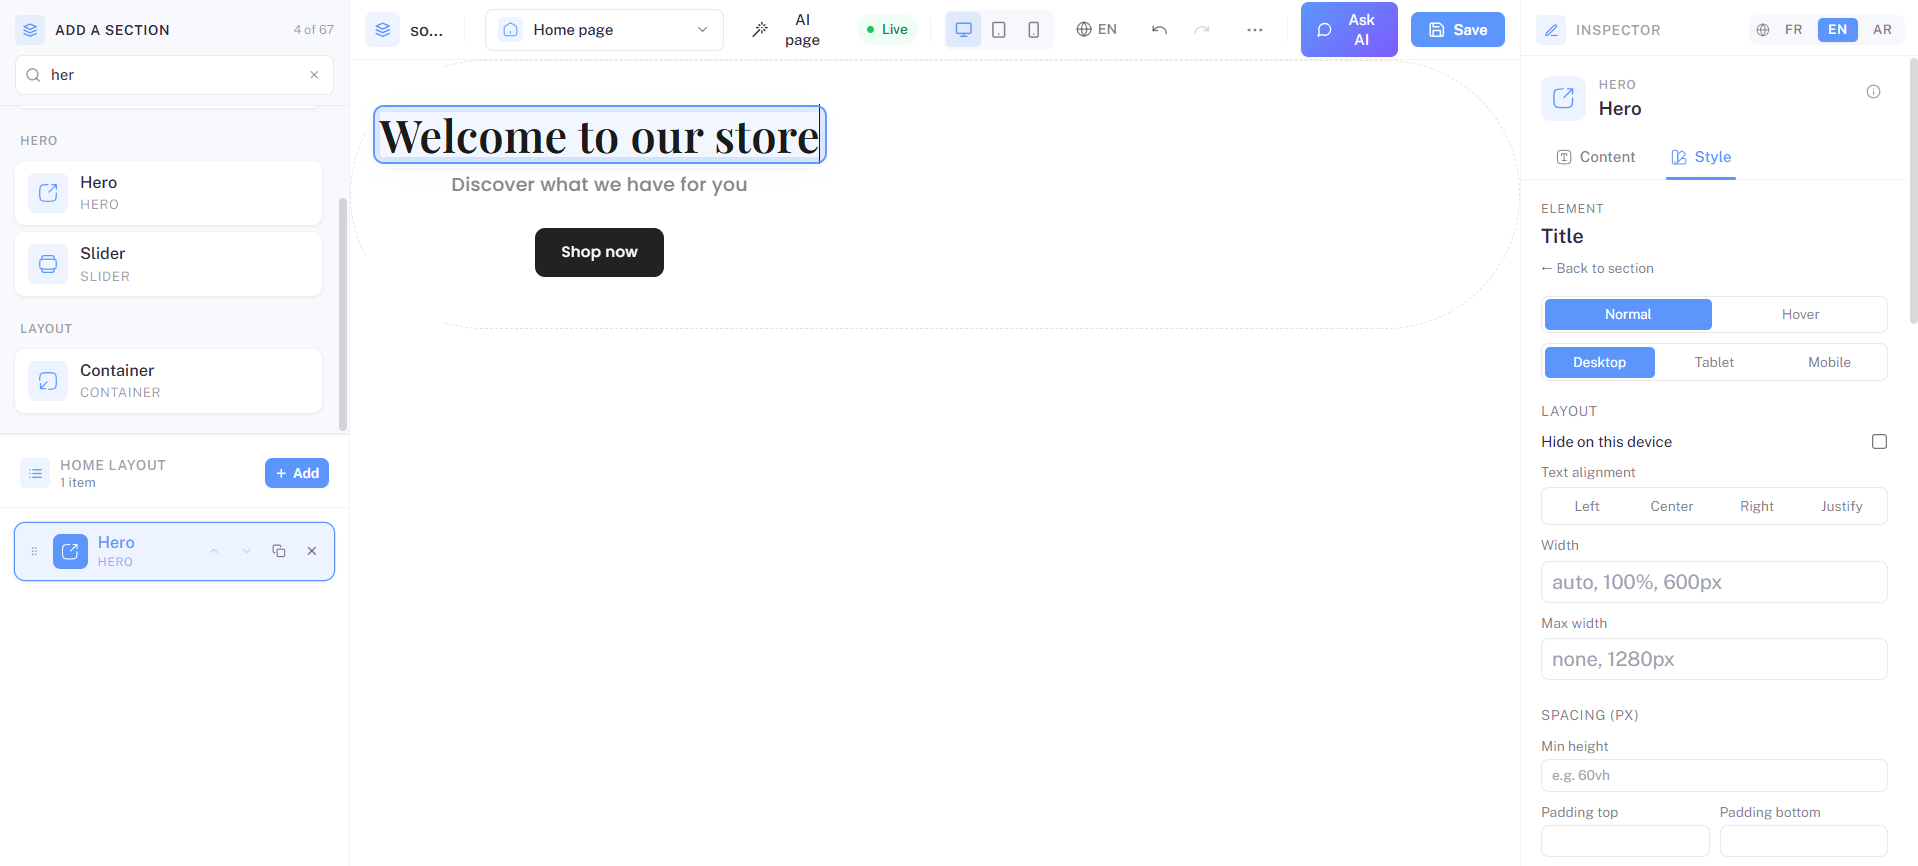
The four regions you'll work with:
- Section library (left). Every registered section, grouped by category. Drag from here onto the canvas.
- Canvas (center). The merchant's storefront in an iframe, rendered live. Click any section to select it.
- Inspector (right). Tabs: Content (the manifest's schema fields), Style (the styleKeys dropdown + style editor).
- Status pill (top). Says Connecting… while the bridge handshake runs, Live once it's connected. Patches don't flow until this turns green.
This is the same UI a merchant sees. Use it to understand what your sections will look like to a real user.
Option B — point the builder at your local souk-theme
Only do this when you want to see your local code changes inside the builder.
- Run souk-theme locally:
npm run dev(already running onhttp://localhost:3001) - Open
https://admin.storeino.world/stores/themes, click Customize. - In the builder's URL bar, find the iframe URL (it points at your merchant's
*.storeino.world). - In DevTools console:
localStorage.setItem('builderUrl', 'http://localhost:5174/theme-builder')then reload. (This only matters for the builder SPA host, not the iframe. Ask Abdel if you want the full local builder setup — it's rarely needed for section dev.)
What's next
Open Anatomy of a section to learn what every file in a section folder does.